
Today I bring to you the instructions for my Christmas Ornaments. The gorgeous thing about these is that this is a “do your own thing” from the very start. The only things that remain the same are the tools you will need, but after that, it is you and your beautiful creativity!
OK, grab yourself a cup of whatever takes your fancy - if you hadn't worked it out yet, my choice is coffee - and let’s get started.
Gather up all your necessary tools to make these lovelies. To make my ornaments I used:
- Air dry clay - I used DAS,
- A rolling pin,
- baking paper,
- My gorgeous stamp from Stampin Up!,
- A skewer or any sharp pointy object,
- metal nail file;
- Pearl white acrylic paint;
- Glue;
- Buffing gold;
- Red Glitter
- Red velvet ribbon.
First thing, get your lovely air dry clay out and roll it to your desired thickness.
- I placed a sheet of baking paper on my bench and rolled my clay on top of this;
- I placed two glass chopping boards on either side of my clay, no wider than my rolling pin, to make sure that I rolled my clay to a level depth.
- Place a sheet of baking paper on top of your clay…and roll away!

Next, take your gorgeous stamp of choice and stamp your images;
- be sure to leave space around your stamp for your shape.

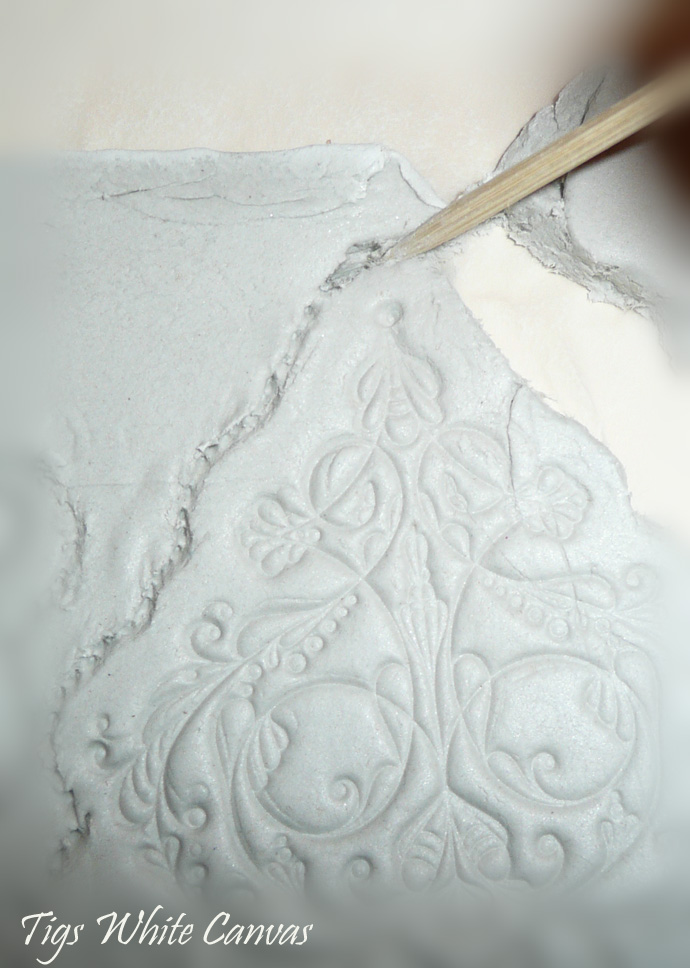
Take your skewer or sharp pointy object – or you may even have the perfect cutting shape that you can use – and cut out your shape;
- With the skewer method, start by “dotting” the outline of your shape around your stamp. This will help you to balance your shape and is easier to fix up with a gentle rub if it is in the wrong place.
- Next, start joining the dots up to reinforce your shape,
- Finally, use the longer edge of the point on your skewer and press all the way through to pull your shape out.
- Press a hole through your shape for threading the ribbon.

Now your ornaments must dry for 24 hours…
…are they done? Beautiful!! Now it is time to give them a little tidy up.
…are they done? Beautiful!! Now it is time to give them a little tidy up.

Sand the edges;
- Using your metal nail file, gently sand around the edges of your shape until you are happy with the results.
- If you need, this is the time to adjust the shape to ensure it is balanced – alternatively, if you are the type of person that likes a skewed uniqueness to your ornaments, just sand until it takes a shape you like.

Decorating time!!
- In the case of my ornaments, I brushed them first with pearl white acrylic paint.
- Let the paint dry…I used my hairdryer to hurry this process along.
- When dry, rub the buffing gold over your ornament until you are satisfied with the results.
- Again, let dry, then re-stamp your image with Versamark ink or, if your stamp is not too ornate, draw inside the shape with a glue pen;
- Sprinkle your glitter over your image; shake it, dust it off, then step back to admire.
- Give a little “YEH!” because it is l-u-v-e-r-l-y.
- Thread up your ribbon through the hole in the ornament and hang it up.
- Dance some more…and feel very chuffed with yourself!!
I do recommend you follow this step, because I did and it felt GREAT!!!


Simple yet lovely!!
I hope you found my tutorial easy to follow and inspiring. Please be sure to let me know if you give them a try, along with a photo!!
Big hugs
Cath
xx

9 comments:
Thank you SO much for the tutorial! I bought some iar-dry clay recently and I have some lovely stamps I want to try out on them....
I have some questions (there's always an awkward customer, isn't there?):
could you stamp with the red to begin with?
Is it hard to stamp exactly with the red ink on top of where you stamped previously?
Okay, that's my time of awkwardness done!
I love these so much, Cath. They're some of the nicest decorations I've seen.
Sarahxx
Yes, I'm back for another snoop!!! Good tip about the baking paper. Is it okay if I link up to this post on my blog next time I post?
Sxx
Beautiful
Unfortunately I haven't this stamp
Greetings
Mari
This is fabulous, they are so beautiful, I'll have to give it a try. I think you will love the wreath, very easy!
XO
Kristin
Hi Cath - I adore these - came over from the link at Sarah's place - great tut by the way - easy to follow and step by step - love that, best le
I have some catching up to do! I've missed ya, Cath. Great tutorial. I love the look of these ornaments & was happy that you linked them up to my party. I used to do the Stampin' Up parties all the time (sold it briefly after college). I need to track down a rep. LOVE this particular stamp.
Off to check out your newest posts. I'm dreadfully behind after preparations for yesterday's family Christmas party!
Hugs to you,
Jami
Hi Cath...am visiting via Modern Country Style. What delightful ornaments you made! My son and I did the the preschool version of these with saltdough today :) but I will be filing your tutorial away for next Christmas so I can do my own grown-up take on them. These are just fantastic, stylish and isn't homemade the best?
Warm wishes for a Merry Christmas,
Erin
www.carolinacountryliving.blogspot.com
These are so beautiful! Thanks for sharing the instructions. It is so wonderful to see how these are made, considering that I just received one of yours in the Creative Color Challenge ornament swap. Thank you so, so much! I will treasure your creation forever. I blogged about it here:
http://sandycoleman.wordpress.com/2010/12/22/holiday-surprise-no-2-and-3/
Take care,
Happy Holidays!
Stopping in from the US via Modern Country Style ...
These are beautiful! I love how classic and elegant these look. Thank you so much for sharing!
~Nike@ChooseToThrive
Post a Comment
Please don't be shy! I love comments, questions and knowing you popped in.