Thursday, September 30, 2010

Inspired by Jami...

Hi all my lovelies

Well, I have been itching to blog about Jami over at Freckled Laundry for a LONG time now...and the time has come. At this very moment my lovely brother and sister-in-law are heading into the hospital to have my wee nephew.

I saw these beautiful bibs and burp cloths using recycled jeans that Jami came up with a little while back and I was in love straight away. Who would have thunk that my boys wearing endless holes in the knees of their jeans could be turned into inspirational burb cloths for their soon-to-be cousin!


Check out these Cookie Monster invites!! I adore these and will some how need to do something with this too...


Jami is a total sweetheart and one very creative chickie!! Plus, Jami likes coffee, so make yourself a cuppa, pop on over to the Freckled Laundry and have yourself a wee meander. I guarantee you won't be disappointed.


On a non-sewing note, Jami has an awesome tutorial on a Faux Zinc painting technique for a nightstand - I think one of my purchases that I blogged about yesterday may get the treatment.

It is just gorgeous, isn't it!! Jami is one of my favourites - both as a newly found blog buddy and as an inspiration!

Now I best get to bed so that tomorrow I can get my sewing mojo on!!

Sweet dreams!! Hugs,

Cath

Wednesday, September 29, 2010

Help with your creative brilliance

Hi lovelies

Please note I am saying this in hushed tones...

I did a very random and rash thing on the weekend - I bid on a 1930s Queen Anne bedroom suite on Ebay! 5 items: my top bid was $200.


Turns out, I won. For a total of approx $32 a piece - AU$160 I have the lot.

I was all inspired - it's all your fault you know, all you talented wonderful women who inspire me constantly with your ability to revive a tired old piece into something truly special and wonderful! The plan was to do these beautiful revamps and sell them at a small profit and feel happy in the process....that was the vision. Only problem was I by-passed reality being the how, what, when, where....

So now poor Mr Tig is hyperventilating about how we transport this stuff - it isn't going to fit in our trailer - he didn't realise it was ALL of the pieces.....where are we going to store it?!!

Lucky he loves me!

So for now I sit in guilt about the purchase and the time to collect and all those issues of transport and storage,...and just a wee touch of sheer excitement at whether I can turn these pieces into something unique!!

Wish me luck

hugs

Cath

Tuesday, September 28, 2010

My first link party

Hi lovelies!!

A quick update following my previous post on my printed fabric label

I have since added the canister to my first ever Link Party over at An Uncommon Slice of Suburbia. I thought it was time to come out of my hidey-hole and join the party :-)

Kristin has also recently posted about printing to fabric - she made a DEVINE cushion - take a looksee at that here...makes me very nervous about sewing a cushion. My personal sewing philosophy that cushions are "curtains with corners" (curtains being pretty much the height of my sewing career) isn't looking too helpful at this stage.

In any case, settle in at Kristin's Uncommon Slice of Suburbia - take a coffee, I am sure she won't mind, and have a really good look around!

Being three blogs in one night...I am heading to bed!

Sweet dreams

Cath

Printing on Fabric - Utensil canister

Hi there my lovelies

In an earlier post I mentioned I had been playing with printing on fabric. (see
here!).

In preparation for the painting of the house, and upon arrival of some wonderful Stampin' Up items, I decided to revamp my terracotta coffee canister that I have been using for my utensils (I have become a coffee snob since we got our machine and so don't have instant in my house, no more, no more!).

So, the canister, being terracotta, was painted first with a coat of White Knight Tile and Laminate undercoat.

Then, when dry, I topped it with a coat of Dulux White Duck (quarter).

My image for printing was using the knife and fork image from Graphics Fairy, and also some text. I merged them together and played in Photoshop until I was happy with the results.., then printed away.

If you missed the previous blog, where I very briefly mention the "how to", here it is again..

  • Using A4 print labels - just like the ones you use for envelopes, only A4 - stick this to your fabric.
  • Trim the fabric to size ensuring there are no stray threads....and print away!!

Easy hey!!

To embellish, I die-cut my printed fabric on my new (woo hooooo!) Stampin' Up Big Shot, punched a couple of holes and attached some lovely Jumbo Eyelets (again, thanks Stampin' Up!!).

Tie with twine...and there we have it!!

I seriously need to find my camera charger, as my phone isn't cutting the photo taking, but you get the idea.

I love the result, so will do my sugar and tea canisters next.

Hugs to you all!! Come on over for some coffee!!

Cath

The white begins...before and after entry way

Woo hoo!!

Finally, the weather has warmed...

Spring has sprung (to be totally cliche)

two of the three wee-Tigs are away...

the timing is perfect to begin painting.

Now if you have been following me thus far, you would know that I am itching to start painting my home in white. The first little room to be treated to a mini makeover, was our entry way. The space is only small, but still, it is important to instantly reflect our home and who we are.

Before...dragging me down....

We have a lovely pew that Mr Tig picked up at an antique shop somewhere many years ago, a cane picnic hamper, a couple of cushions I bought to throw on my (then) navy couch, a rustic wood mirror...we have a cute silver crystal mini chandie hanging...but dirty cream/yellow walls....

I chose this room as it was one I could tackle myself to kick-start us off on the great white adventure.

Please note: The front door, on the left, will be painted white in due course. Then, on the right, there is a coat cupboard with the original 80s flat door - that will be completely replaced in time too. Sorry, I just can't bring myself to widen the photo any further...once I do the doors I promise I will!!

So what did I do...?

I painted the walls and ceiling in semi-gloss white. White; straight from the can, white. No tint, nope, I couldn't decide in the end, but Ms Rachel Ashwell saw me through that little dilemma and I just went white.

Mr Tig went out with the wee-Tig for a little while to let me have some clear time to clean and mask up (which I secretly admit, I find really therapeutic...please don't tell anyone!! ), so by the time he got home, I had completed my first coat and two coats on the mirror. A second coat later, and we were pretty happy.

I decided to make a twig wreath to attach to the top corner of the mirror, to add a bit of dimension, when Mr Tig hit a creative moment and popped some twigs across the mirror. I am not sure if he was kidding, but straight away I loved it...and in shock, Mr Tig did too!! I admit, we had a high-five moment at that point.

So that, my lovelies, was simply it: I took the pillows from the family room (for now) to give some extra life and we were complete!


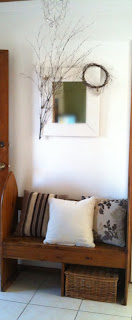
After - woo hooooooooo!!


Really simple I know. I can't wait for the doors to be completed, but for now every time we walk in the house we are greeted with our first metamorphis of Spring, and are very happy.

I won't tell you about the three layers we then added to the family room and kitchen. It is a longer tale and is only early stages - yes, three layers of white made it onto our walls. 10L of white paint is almost gone. Already, there is a remarkable difference, but there is more white to come...

...stay tuned.

Hugs


Cath

Friday, September 24, 2010

Room with a view...

Happy end of the week my lovelies

For a change, I have just a few words today;

Breathtaking....


breathtaking,
breathtaking. images from Interior Exterior Plan


OK, so that was one word, three times :-)

Which location would you choose as your Friday night wind down location?

Whatever you do end up doing, I hope you have a devine evening of bliss!

hugs

Cath

Wednesday, September 22, 2010

Still thinking...

I am still inspired....still looking...

DecorPad

This is similar to our bathroom layout, only minus the loo!

Although ours is white, and a single, the line of the basin is similar to ours with the shower on this side of the photo.

I love these tiles.....and the light...the soft towels, the little vignet in the window. Just delightful.


Pure and pretty!!


This I love...the bath nestled in a little nook, with a quaint little window that overlooks a clearly well screened garden ....

I would love a lovely, long soak...an escape from the wee Tig-tribe, where I can lock the door and pretend I am not in there: fill it right up, stretch right out, candles flickering, yummy bath scent...adding more hot water because it is getting cold. Ahhhh, bliss.

Have a great night,

hugs

Cath

Tuesday, September 21, 2010

To do list: number 1 - choose bathroom tiles

Good evening my lovelies

Okay, so I am very keen to hear from all you renovating gurus on what to do when you have "the vision"...but your lovely husband just isn't seeing it. Or maybe he is the voice of reason in amongst all my delusions of bathroom grandeur?

The original plan for our main bathroom was that Mr Handy-Tig (aka Hubbie) was going to install a new bath and vanity himself. The tiles are neutral beige, so we decided to save on cost and live with those at the moment. We agreed that the brassy gold edged-shower would also be going, but hadn't reached the point of purchasing the replacement.

So there he was, Mr Handy-Tig, poised with his tools of the trade, ready to delicately extract the epitome of 80s neutral tonings, beige, cream and apricot with an accent of gold.

Me? I would have gone at it with a sledge hammer.

First, out with the apricot toned timber vanity with "cut in" towel rails, followed closely by the beige apricot bath that was both short AND ugly.

Next, Mr Handy-Tig brought in the new pure white vanity with seamless moulded sink...(is that angels singing), followed by our new long white bath.

Stand back. Admire. Uh-oh, hang on. What's this!?

The plumbing, set into our concrete slab, is not where it should be. Oh! And the new bath is slightly wider than the previous pretender to the job; this will require lifting the first row of tiles out. Hmmm, that wasn't in the plan.

"Okay! Never fear" exclaims Mr Handy-Tig, "I will get my trusty tools and remove each tile, hopefully not cracking any in the process".

At this point, I made coffee.

Cut to a little bit later...hark, is that the dulcet tones of Mr Handy-Tig muttering to himself. I'm not sure if it was the language, or that his delicate touch just wasn't delicate enough, but those beige tiles cracked...and cracked.

At this stage my lovely Mr Handy-Tig decided that the job was going to be a bigger nightmare than it was worth and it was time to bring in reinforcements who get paid to do this stuff for a living...by choice!!

Hoorah!!

So come October, we are getting the complete new fab bathroom. Now I would love a free standing bath...a chair...a cupboard...a vaulted ceiling...no kids to ever enter the space to ruin the illusion (sigh) ... but the reality is, it is a typical bathroom for a bath, basin and shower. There is room to stand - and if we are super lucky, all three children are NOT in the bathroom at once - this is a chaos factor, not a limited space issue.

So I am inspired. I would like white everywhere, with our vanity, bath AND the tiles, then I would like to paint the walls in Dulux White Duck quarter - a warm grey - to bring in some tone with all the white, but without darkening the space.

Issue - the tiles. What type. What size? I pondered this, and thought that perhaps smaller white mosaic tiles on the floor, with a subtle shift in "whiteness" - then a "coaster" sized tile on the walls of the shower and edging the vanity and bath. We are not going to tile our whole space because we don't want it to be sterile. So I thought the smaller tiles in the smaller bathroom may add an element of interest amongst all the white.

So, I really liked this....


...and Mr Handy Tig said no way - it reminded him of "old bathrooms". Old bathrooms with timber floors and rustic elements he likes - this, he doesn't. Fair enough...but I am stuck.

I would love to have some extra guidance on this, given these are going to be there for a while!! I am inspired by the idea of the lightness, the airy feel, by the luxury of soft towels, gorgeous soaps and the occassional opportunity to soak in a lovely bath...

Tara Dennis


love this colour

Okay, I am dreaming here...

I am not sure where I got these two beautiful images from...
please let me know if they are yours, or you know who deserves credit.

Okay lovelies, thoughts...ideas...inspiration...guidance?
I would love to hear from you....
Bigs hugs!

Cath

Thursday, September 9, 2010

Experimenting...


Hi lovelies

I am still here, I promise! It has been a little busy in the Tig household of late, but I have managed to squeeze in some experimenting time. Unfortunately nothing I am prepared to show you yet...but I will soon, I promise.

Anyway, I have been looking at image transfer to fabric. I am in love with the beautiful french design pillows, but honestly, how expensive they are!!!! Crazy!! And I thought to myself, "Catherine, it is time to dust off your sewing maching (only used previously for hemming curtains) and make a cushion." Seriously, how hard can that be! Surely it is just like hemming curtains, only with corners...right?!

So, off I went in search of instruction....

The lovely Kristine at The Painted Hive was kind enough to mail me the instructions for doing a citrus rubbing of printed images onto fabric.

So I sourced the most gorgeous image from The Graphics Fairy


and then using the rubbing method, rubbed my little heart out!! Those results were pretty good. I even attempted a "Bonne Nuit" rubbing for a pillow for Boo's room...again, just a curtain, with corners, but longer...yeh...?

...can you tell I haven't started sewing yet...

...yes, I AM procrastinating...

Anyway, then I decided to attempt another method. I bought A4 print labels - just like the ones you use for envelopes, only A4. Stuck it to my fabric...trimmed my fabric so there were no stray threads...and printed away.

Let me tell you, that was PERFECT!!

So, when I finally sew these little experiments up, I wil post some pics. Promise.

Even if they do look like curtains with corners :-)

Stay tuned!!

hugs

Cath


Related Posts Plugin for WordPress, Blogger...