Showing posts with label How to. Show all posts

Monday, January 3, 2011

It's a New Year - are you ready to learn?

Hello my dear friends and welcome to 2011!!

I hope you have all had a safe and wonderful festive period.  We enjoyed a wonderful Christmas day with family and friends, as well as a wonderful holiday period enjoying bike riding, walking, relaxing and a trip to the coast for some absolutely stunning weather with my parents before New Years...it was the perfect end to 2010.

As always, the beginning of the year harks the time to make resolutions and to set personal goals. I have one resolution this year that will help me achieve my goals, one of which relates to an original intention for this blog: sharing "How to's" on painting.

For a variety of reasons I have always put it off and I came to realise that what I was doing was procrastinating: I had so many good reasons to NOT start. The truth is, one word held me back: FEAR.

So my New Years resolution is to put that little bad guy to bed. In order to do that I will question him, answer him, then sweep him out the door.

Please feel free to grab a cuppa while I set this little guy straight.

What do I fear...
  1. whether there is any value with what I have to share;
  2. someone will say that it isn't true/correct/right;
  3. failure;
  4. lack of interest.
 Erghhhh, isn't Fear a nasty little grey mass of fluff sitting there on my floor like a giant dust bunny!

Well, let me answer all those little taunts that Fear likes to throw at me, particularly in the wee hours of the morning:

Is there any value in what I have to share:
I have had plenty of affirmation over the years from people that what I can do is good. That where others need to work at it, I can do it easily. I have been told that art is my gift.  Whilst I wish for the things I so admire in others, like;
  • singing well at all; 
  • being less gormless playing sports;
  • being extremely organised through a bit hard yakka (work)
I CAN do this and I LOVE helping others enjoy painting: it is something I have done whenever I have had the chance, so why not extend it further. So is there value: yes! For me and for anyone who would like to participate.

What if someone says something is wrong, etc etc etc. Then I will embrace it as a learning exercise like all other times I have been redirected with art. I don't know everything and will never claim to know everything: so it will be as much a learning experience for me as for others.

What if I fail? I will fail only by NOT trying. Failure is Fear's favourite taunt: a big wall that I often throw down before myself; that 'voice of reason' that stops me doing something new, just in case I fail. Whilst I have no measure for this failure,...I can't quantify it; I know it stops me. So, in answer to that question: I will not fail, by just taking a step forward. Then another step...and onwards until that voice can't be heard anymore.

And what if no one is interested? Well, time can only tell. But I won't know unless I try, right?!

Alrighty, that's sorted: excuse me while I take the rubbish out.

And now I am back!!

So, the first lesson will be on painting with a mixture of water colours, acrylics and pencils similar to this painting that I did for my Mum for Christmas.


I would like to get everything together and sorted here at the White Canvas before I go much further - I would like to do some "New Year" cleaning on my blog - then I should be ready to go in a week.

So stay tuned my lovelies - let me know if you have any particular questions, fears of your own or needs in preparation for taking on this exciting challenge. I love questions, so please ask away!!

Big hugs to you all - I am really excited about our year ahead together.

Cath
x

Monday, December 6, 2010

How to make - Christmas ornament tutorial

Hi sweet friends

Today I bring to you the instructions for my Christmas Ornaments. The gorgeous thing about these is that this is a “do your own thing” from the very start.  The only things that remain the same are the tools you will need, but after that, it is you and your beautiful creativity!

OK, grab yourself a cup of whatever takes your fancy - if you hadn't worked it out yet, my choice is coffee - and let’s get started.

Gather up all your necessary tools to make these lovelies.  To make my ornaments I used:

  • Air dry clay - I used DAS,
  • A rolling pin,
  • baking paper,
  • My gorgeous stamp from Stampin Up!,
  • A skewer or any sharp pointy object,
  • metal nail file;
  • Pearl white acrylic paint;
  • Glue;
  • Buffing gold;
  • Red Glitter
  • Red velvet ribbon.

First thing, get your lovely air dry clay out and roll it to your desired thickness.
  • I placed a sheet of baking paper on my bench and rolled my clay on top of this;
  • I placed two glass chopping boards on either side of my clay, no wider than my rolling pin, to make sure that I rolled my clay to a level depth.
  • Place a sheet of baking paper on top of your clay…and roll away!


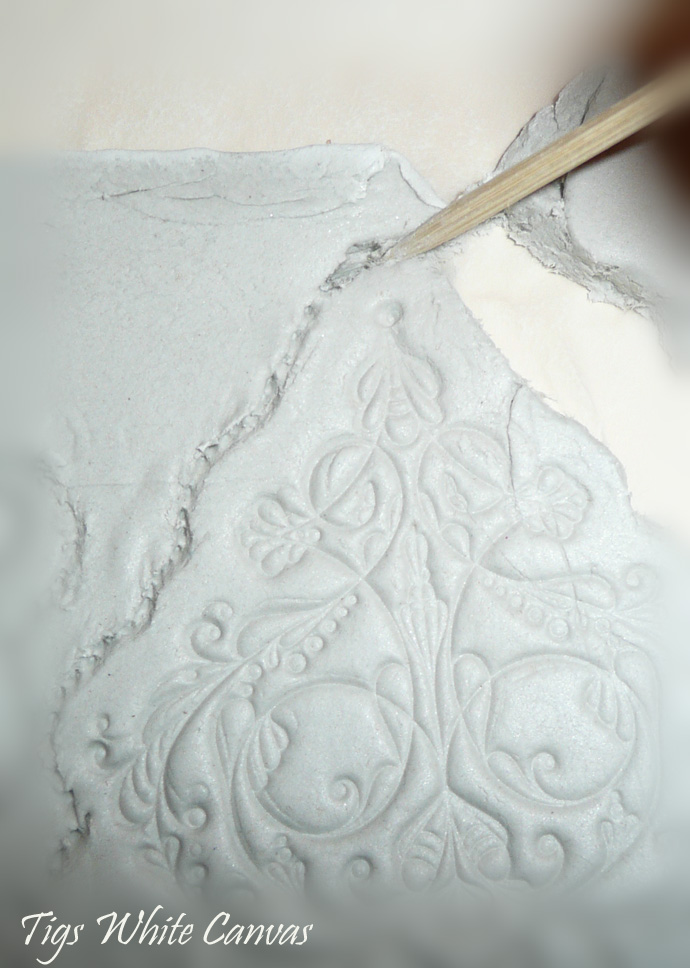
Next, take your gorgeous stamp of choice and stamp your images;
  • be sure to leave space around your stamp for your shape.


Take your skewer or sharp pointy object – or you may even have the perfect cutting shape that you can use – and cut out your shape;
  • With the skewer method, start by “dotting” the outline of your shape around your stamp. This will help you to balance your shape and is easier to fix up with a gentle rub if it is in the wrong place.
  • Next, start joining the dots up to reinforce your shape,
  • Finally, use the longer edge of the point on your skewer and press all the way through to pull your shape out.
  • Press a hole through your shape for threading the ribbon.


Now your ornaments must dry for 24 hours…

…are they done? Beautiful!! Now it is time to give them a little tidy up.


Sand the edges;
  •  Using your metal nail file, gently sand around the edges of your shape until you are happy with the results.
  • If you need, this is the time to adjust the shape to ensure it is balanced – alternatively, if you are the type of person that likes a skewed uniqueness to your ornaments, just sand until it takes a shape you like.  


Decorating time!!

  • In the case of my ornaments, I brushed them first with pearl white acrylic paint.
  • Let the paint dry…I used my hairdryer to hurry this process along.
  • When dry, rub the buffing gold over your ornament until you are satisfied with the results.
  • Again, let dry, then re-stamp your image with Versamark ink or, if your stamp is not too ornate, draw inside the shape with a glue pen;
  • Sprinkle your glitter over your image; shake it, dust it off, then step back to admire.
  • Give a little “YEH!” because it is l-u-v-e-r-l-y.
You can choose to not follow this last instruction, though be warned you may spontaneously whoop, yell, laugh or clap your hands in glee – it is a side effect I found during this process, so consider yourself warned in advance.

  • Thread up your ribbon through the hole in the ornament and hang it up.
  • Dance some more…and feel very chuffed with yourself!!

I do recommend you follow this step, because I did and it felt GREAT!!!


Simple yet lovely!!

I hope you found my tutorial easy to follow and inspiring.  Please be sure to let me know if you give them a try, along with a photo!! 

Big hugs

Cath

xx

Enhanced by Zemanta

Tuesday, September 28, 2010

Printing on Fabric - Utensil canister

Hi there my lovelies

In an earlier post I mentioned I had been playing with printing on fabric. (see
here!).

In preparation for the painting of the house, and upon arrival of some wonderful Stampin' Up items, I decided to revamp my terracotta coffee canister that I have been using for my utensils (I have become a coffee snob since we got our machine and so don't have instant in my house, no more, no more!).

So, the canister, being terracotta, was painted first with a coat of White Knight Tile and Laminate undercoat.

Then, when dry, I topped it with a coat of Dulux White Duck (quarter).

My image for printing was using the knife and fork image from Graphics Fairy, and also some text. I merged them together and played in Photoshop until I was happy with the results.., then printed away.

If you missed the previous blog, where I very briefly mention the "how to", here it is again..

  • Using A4 print labels - just like the ones you use for envelopes, only A4 - stick this to your fabric.
  • Trim the fabric to size ensuring there are no stray threads....and print away!!

Easy hey!!

To embellish, I die-cut my printed fabric on my new (woo hooooo!) Stampin' Up Big Shot, punched a couple of holes and attached some lovely Jumbo Eyelets (again, thanks Stampin' Up!!).

Tie with twine...and there we have it!!

I seriously need to find my camera charger, as my phone isn't cutting the photo taking, but you get the idea.

I love the result, so will do my sugar and tea canisters next.

Hugs to you all!! Come on over for some coffee!!

Cath

Related Posts Plugin for WordPress, Blogger...